I recently discussed how to tackle your finances and bookkeeping if you’ve fallen behind this year. Today, I’m talking more in depth about getting your financial paperwork organized for year-end so that you’re ready for tax prep. This applies whether you plan to do your taxes yourself, or turn the work over to a tax professional. Get ready to wrangle, sift, and sort all those receipts and papers you’ve been hoarding!

how to get your financial paperwork organized for year-end
If you’re a bit behind on your bookkeeping and ready to get up to speed, some pre-work organization will help make the data entry process less stressful. Get all those receipts and documents sorted and systemized, and then you can start to enter your transactions month by month.
There are two main reasons to gather up all your financial documents – First, having them on hand will make doing your bookkeeping and taxes a lot easier. Second, if the government decides you’re the lucky subject of an audit, you’ll need them ready and organized to back up your numbers.
THE IRS RULES ON RECEIPTS & DOCUMENTATION
First thing’s first, before you drown yourself in paperwork, I think it helps to understand the IRS requirements when it comes to documentation. Let’s discuss what sort of paperwork you should be holding onto and how long you need to hold onto them. The IRS covers everything you need to know about record keeping in Publication 583. The following info is taken from there.
For receipts – If you don’t have a receipt for an expense, then technically you shouldn’t deduct it for tax purposes. What this boils down to for you is that a line on your bank statement is not good enough by itself to deduct that expense on your tax return. The line on your bank statement doesn’t really tell the IRS everything they need to know if they audit you. Thus, the IRS gives us the following guidance for what sort of documentation we need for substantiating our tax deductions (i.e., the business expenses you put on your tax return):
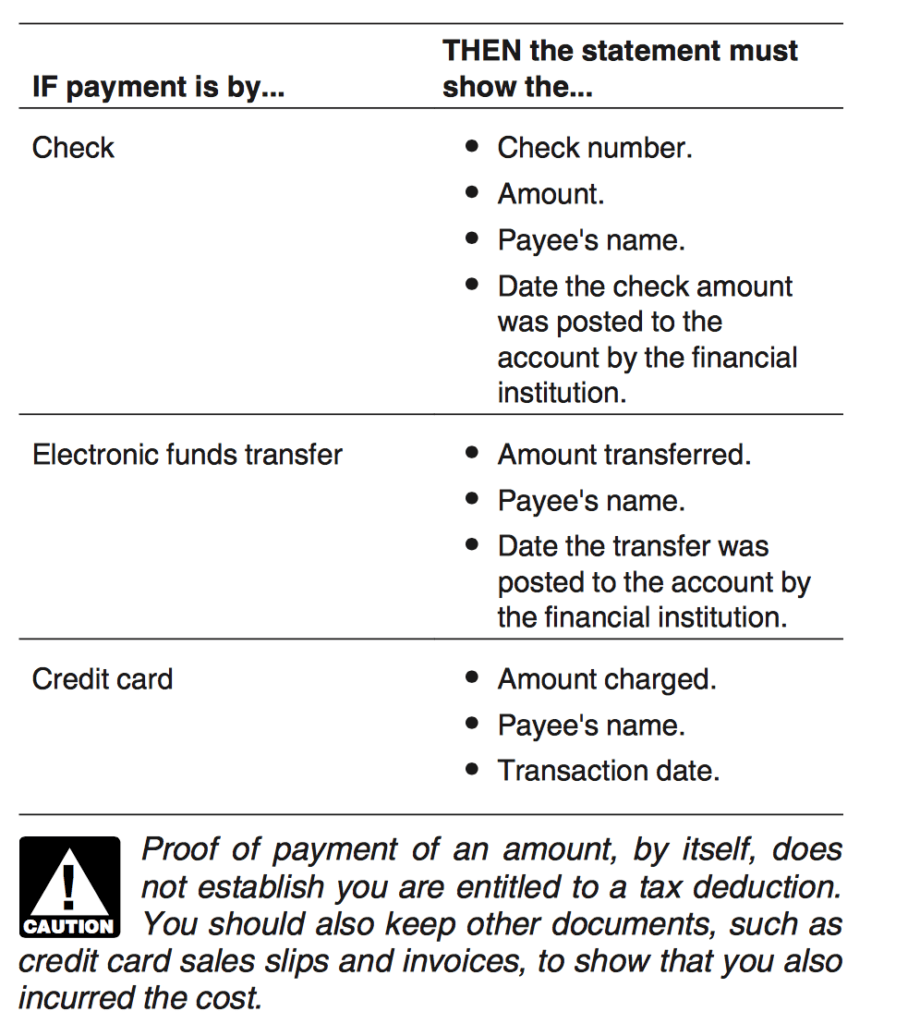
See that little note of caution at the bottom? Proof of payment (like the line on your bank statement) by itself doesn’t establish that you’re entitled to that tax deduction. Basically, you need receipts!
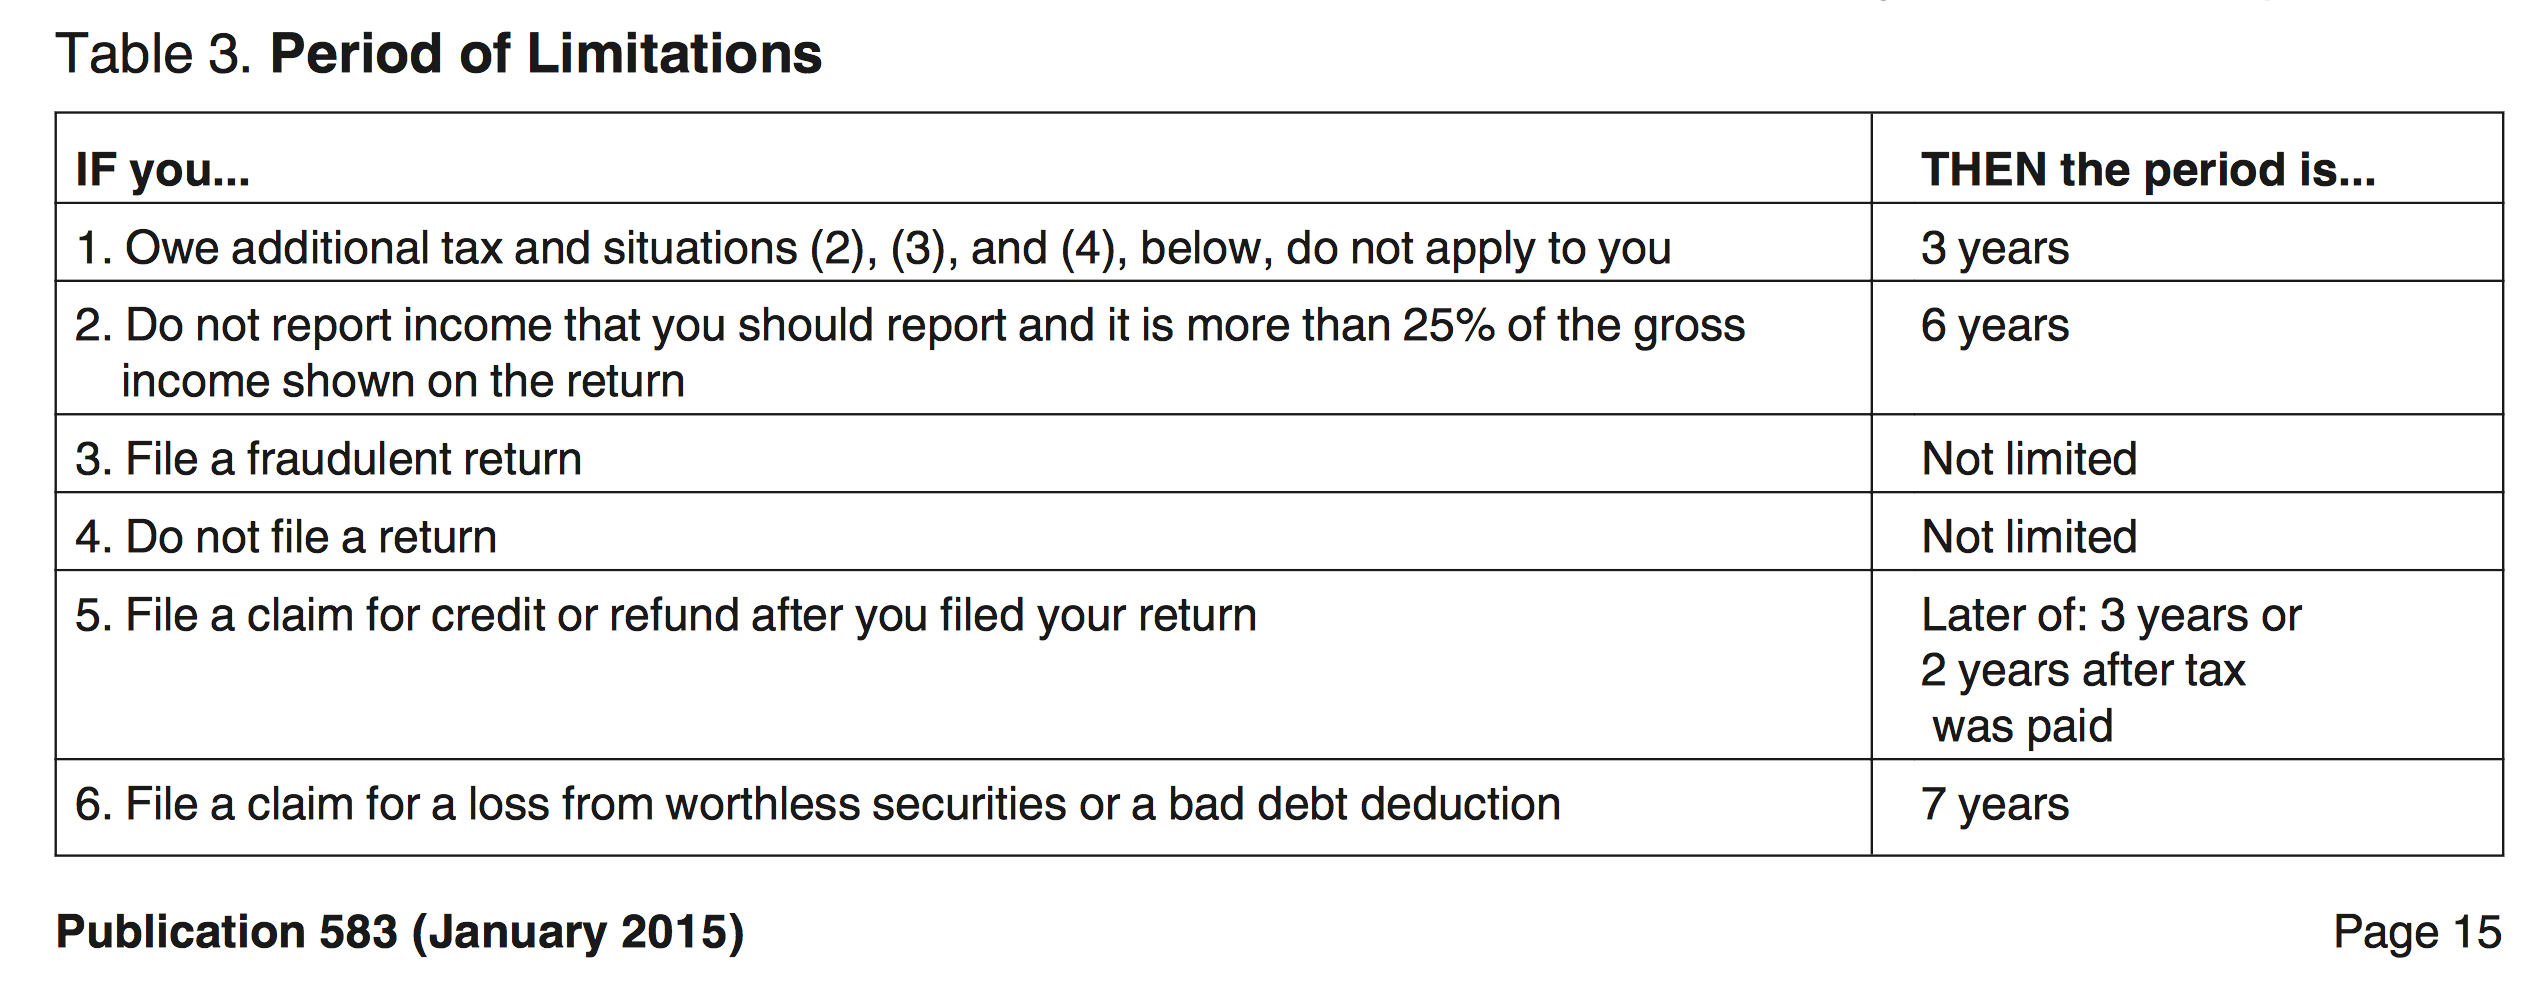
The IRS also tells us how long they want us to hold onto our receipts and records. Generally, it’s a minimum of three years, but you might want to hold onto your records even longer.
Now that you know what the government requires of you, let’s start sifting through those receipts!
1. SET UP A PHYSICAL FILE SYSTEM TO ORGANIZE YOUR FINANCIAL DOCUMENTS.
Our first step is to create a folder system for organizing papers. You probably have physical (printed) paperwork lying around, and a lot on the computer too. The goal is to get all your paperwork sorted in such a way as to make entering all your transactions easier later on.
For your physical organization system, I suggest a file folder system. You can divvy your documentation up chronologically (like a folder for each month), and/or by expense category (inventory purchases, office expenses, advertising, etc.). Get yourself 12 pretty file folders, pocket folders, sleeves…whatever calls to you. Or grab whatever you already have on hand. The important thing is simply to get 12 folders and label them for each month of the year. You’ll sort your paperwork by month, and then clip together the documents in each month that belong to the same expense category (I know you’ve been looking for any excuse to buy those cute fancy gold binder clips at Target!).

2. SET UP A VIRTUAL FOLDER SYSTEM TO ORGANIZE YOUR DIGITAL DOCUMENTS.
For your digital receipts, emails, and all the stuff on your computer, I suggest a similar system but in virtual form. Create monthly folders with expense categories as sub-folders within each month. As you find receipts and important financial files on your computer, you can move them to these folders. You can “print to PDF” any emails that you want to save as well. It’s a good idea to save these folders to your Google Drive, iCloud, or some cloud-based system in case your computer hard drive ever fails.
I love using the Neat Receipt app for this. With Neat, I can take pictures of physical receipts from my phone and Neat will organize them in my digital filing system (and keep them safe on the cloud if I ever need them). I can also forward any digital receipts or emailed invoices to my personal Neat cloud address to store as well. This helps me quickly & easily stay organized and get rid of my paper clutter.
Besides being a reliable solution for storing & organizing my receipts on the cloud, Neat will also create expense reports (to make entering this stuff in my books each month more streamlined) and it even exports to CSV format (for your P+S spreadsheet!) or Quickbooks (if you’re one of “those” people ). Learn more about Neat here.
3. PRINT COPIES OF ALL YOUR BANK STATEMENTS AND FILE THEM.
You might’ve been shoving all your receipts into that hypothetical shoebox over the course of the year, or they might just be all over the place. Worse case scenario – you haven’t been purposely holding onto any receipts. What’s the best way to go back and remember what you spent your biz money on? If you weren’t saving those receipts as you go, I’ve got a suggestion – log into your business bank account, credit card account, and possibly PayPal (if that applies), and go through your transactions.
I’d recommend printing monthly statements from all of these accounts. This creates easy documentation to enter your transactions later on. These reports also create a nice paper trail for the tax man in case you ever need to back up your sales or deductions. After printing these reports, staple or clip them together and sort in the applicable monthly folder.

Bank statements are great for entering your transactions, but remember – you need more than just a line on your bank statement to substantiate (or “back up”) an amount on your tax return. That’s where receipts, invoices, and other documentation comes in handy. These receipts basically prove your expense transactions. Receipts also can give you an item-by-item breakdown of what you bought (that a single line on a bank statement can’t tell you), and this is important so you know how to categorize an expense (especially since it could be more than one category in a single purchase).
4. FIND THE REST OF THE DOCUMENTS YOU NEED TO SORT…AND ACTUALLY SORT THEM.
Set aside some time to go through your cabinets, shoeboxes, drawers, and wherever else you might stash your receipts, and then file them away in the applicable monthly folder. This is the time to find all those Hobby Lobby and Michaels receipts! If you buy a lot online, it might be easier to search your inbox based on your bank statements, and *star* or print to PDF all those digital receipts you have.
Keep your eye out for business documentation other than just receipts and invoices. It’s also a good idea to file your sales tax permit, copies of any previously filed returns (like state sales tax forms or last year’s income tax return for your business), legal documents, contracts with suppliers or other professionals, etc.
Now that all your papers are organized, it will be that much easier to do the dirty work of actually entering all those transactions! Don’t forget to check out my previous post which includes a free checklist and planning calendar to help you breakdown the work of entering all these items into your financial books.





[…] Remember the IRS has some requirements regarding the paperwork you need to back up (or “substantiate”) any of the deductions you take for your business. More on that here. […]
One tool that I recently started using is called Hubdoc. It makes organizing receipts super easy! I just scan my receipts right to hubdoc and then it codes them and you can send the expense over to quickbooks online or xero. It’s $20/month but has SAVED me SO MUCH TIME!
I LOVE all your content. It has been so helpful. Just wanted to give you a heads up that your referral links (3 on this page) are not working. P.s. I am a Leblanc too, maybe we are related = )
FYI, your links to neat are broken – get a 404 error
Thanks for the post
Great post! So happy I found this, thank you.
oh my goodness…I’m done for!!! I’ve got a LOT of work to do.
[…] Remember the IRS has some requirements regarding the paperwork you need to back up (or “substantiate”) any of the deductions you take for your business. More on that here. […]
One tool that I recently started using is called Hubdoc. It makes organizing receipts super easy! I just scan my receipts right to hubdoc and then it codes them and you can send the expense over to quickbooks online or xero. It’s $20/month but has SAVED me SO MUCH TIME!
I LOVE all your content. It has been so helpful. Just wanted to give you a heads up that your referral links (3 on this page) are not working. P.s. I am a Leblanc too, maybe we are related = )
FYI, your links to neat are broken – get a 404 error
Thanks for the post
Great post! So happy I found this, thank you.